The Herb Bar

When we took down the fence around the garden we had a bunch of good boards left, so naturally I spent some time pinteresting.  I had seen a few ideas with building sort of a wall and then hanging little containers of herbs.  DH initially built this as a side table to put drinks on next to the hot tub but it was too hard to reach and just awkward.

Before

So I repurposed it into an Herb bar!

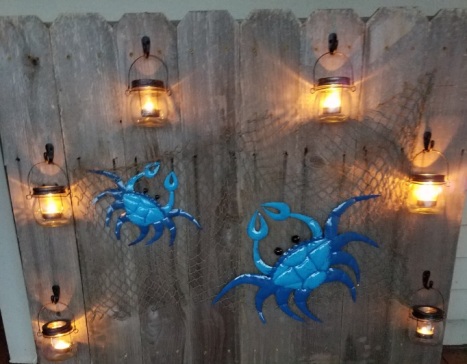
My initial herb buckets (from Michaels craft store) had a basil plant, sage plant, mint plant and thyme seeds (sitting in the sun germinating for this picture).  Add metal blue crabs, some netting and tealight size hanging mason jars (also Michaels).  Cute right?!

Initial Display

After 2 weeks the basil and sage just grew like a tree (straight up) and my seeds didn’t quite like the environment but the mint plant looked great!   So I changed out the basil, sage and thyme seeds for oregano, chocolate mint and thyme plants.  Much better!  This is the effect I was looking for:

Final

Tip: I used gallon size ziploc bags to line the bucket, put some rocks in the bottom and then planting soil.  I cut off the excess top of the bag after the plant was well watered the first time, so the top is just about even with the rim so you can’t tell it’s there.  Hopefully this keeps the buckets from rusting so I can keep using them.

This is with the tea lights lit:

Dusk

Bonus points for practicality – I used a few mint leaves to make coconut-lime mojitos!  And I read spiders don’t like mint so every few days I snip a few leaves off to release the scent.  I’m not sure if that’s the same effect as using the essential oil but let’s not get started on that dabble…at least not yet!

A bug in the craftroom

One of my BFF’s loves ladybugs and I when I saw this on Pinterest I knew I had to attempt it – an applique ladybug table center piece.  Thanks to pre-selected fat quarter sets picking out the fabrics was easy, the back is a pre-quilted pre-batted black and white paisley print.  I happened upon a ladybug party invitation which was the perfect template for the ladybug. After a trial run I discovered the black fabric I picked out was too flimsy for the head and antenna so I found a thicker fabric and that made it much sturdier.

ladybug1

Two parts of this project were  a challenge for me  – getting the corner blocks sewn in properly (my seam ripper got a workout after I realized my first mistake) and the ladybug applique.  Thank goodness for YouTube videos on appliqueing! I did a practice run which was helpful to say the least.  I wanted to prevent the sides of the ladybug from lifting and because I didn’t quilt the whole piece it needed something to hold the middle down. So I experimented with some stitches on my sewing machine and found this scalloped one –

ladybug2

I was really happy with the effect! I learned when using one of these automatic stitches you need to let the machine do the work and not hurry it along, you can see a few scallop stitches that are not as dense as the others where I pulled the fabric too quickly (patience ladybug!!).  I will definitely experiment more with the stitches on the machine now that I have some confidence.

My next project is my Halloween costume which I am SUPER excited about and will be posting about soon!